Jupyter
Current upstream reference: Running Jupyter Notebook. Cluster-specific launch instructions will be updated separately.
Jupyter Notebook Configuration and Usage on RUPC
Configuration
Introduction
A traditional way to start Jupyter Notebook on a cluster is to connect using ssh -Y and enter thejupyter-notebookcommand in the terminal. After a minute or two, a browser window should appear. A browser running on the cluster may respond slowly, depending on network speed and system load. The approach below uses a virtual private network (VPN) to connect your computer to the cluster over a private network. You can then use your local browser to access Jupyter Notebook running on the cluster, reducing the amount of data transferred. This approach uses the private network for cluster access and does not require the firewall configuration described for public access.
Prerequisites
One-Time Configuration on RUPC
To configure the Jupyter Notebook server, log in to the RUPC cluster using rupc02. Then follow these steps to set up and run Jupyter Notebook.- Load the Anaconda2 module:
module load anaconda2 - Generate the Jupyter Notebook configuration file:
cd ~
jupyter notebook --generate-config
This command will create a default Jupyter Notebook configuration file: /home/user/.jupyter/jupyter_notebook_config.py, where user should be replaced with your username. Replace user with your username in all examples and commands below.
- For security, set a password for your Jupyter Notebook server:
python
>>> from notebook.auth import passwd
>>> passwd()
Enter password:<your-password>
Verify password:<your-password>
'sha1:<your-sha1-hash-value>'
>>> Ctrl+Z
Save the SHA1 hash for later use. It will look like this:
sha1:44add4a345cc:bdr1fb6343557bff721e65e78fc511c41b13e8be. - Create a self-signed certificate and a matching key:
mkdir ~/certs
chmod 700 ~/certs
cd ~/certs
openssl req -x509 -nodes -days 1095 -newkey rsa:2048 -keyout jupyterkey.key -out jupytercert.pem
The last command will generate a certificate file
Example command output:/home/user/certs/jupytercert.pemand the matching key file/home/user/certs/jupyterkey.key.Generating a 2048 bit RSA private key ..................................................................................................................................................................................++ ................................................................................................................................................................................................................................................................++ writing new private key to 'jupyterkey.key' ----- You are about to be asked to enter information that will be incorporated into your certificate request. What you are about to enter is what is called a Distinguished Name or a DN. There are quite a few fields but you can leave some blank For some fields there will be a default value, If you enter '.', the field will be left blank. ----- Country Name (2 letter code) [XX]:US State or Province Name (full name) [ ]:NJ Locality Name (eg, city) [Default City]:Piscataway Organization Name (eg, company) [Default Company Ltd]:Rutgers Organizational Unit Name (eg, section) [ ]:Physics Common Name (eg, your name or your server's hostname) [ ]:rupc02 - Open the default configuration file in a text editor, such as vi:
vi /home/user/.jupyter/jupyter_notebook_config.py - Find the following lines, uncomment them, and modify them as shown below. The result should look like this (remember to replace user with your username.):
c.NotebookApp.certfile = '/home/user/certs/jupytercert.pem'
c.NotebookApp.keyfile = '/home/user/certs/jupyterkey.key'
c.NotebookApp.ip = '10.10.10.2'
c.NotebookApp.open_browser = False
c.NotebookApp.password = 'sha1:<your-sha1-hash-value-from-step-#3>'
Save the configuration file and exit the editor.
Running Jupyter Notebook
On RUPC
- Log in to the cluster and load the Anaconda2 module:
module load anaconda2 -
Start the Jupyter Notebook server:
Example command output:
jupyter notebook[10:16:43]udo@rupc02:~>jupyter notebook [I 10:16:44.736 NotebookApp] Serving notebooks from local directory: /mnt/home/udo [I 10:16:44.736 NotebookApp] 0 active kernels [I 10:16:44.736 NotebookApp] The Jupyter Notebook is running at: https://10.10.10.2:8888/ [I 10:16:44.736 NotebookApp] Use Control-C to stop this server and shut down all kernels (twice to skip confirmation).
On your computer
- Start an OpenVPN connection to RUPC.
-
Open your browser and visit the URL displayed on RUPC when the Jupyter Notebook server started (https://10.10.10.2:8888/ in the current example).
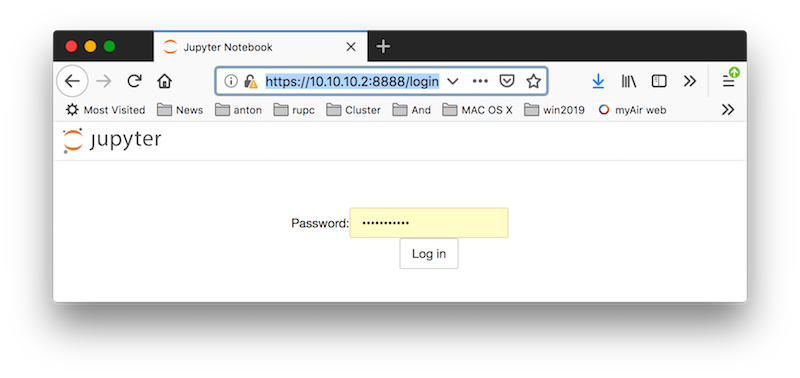
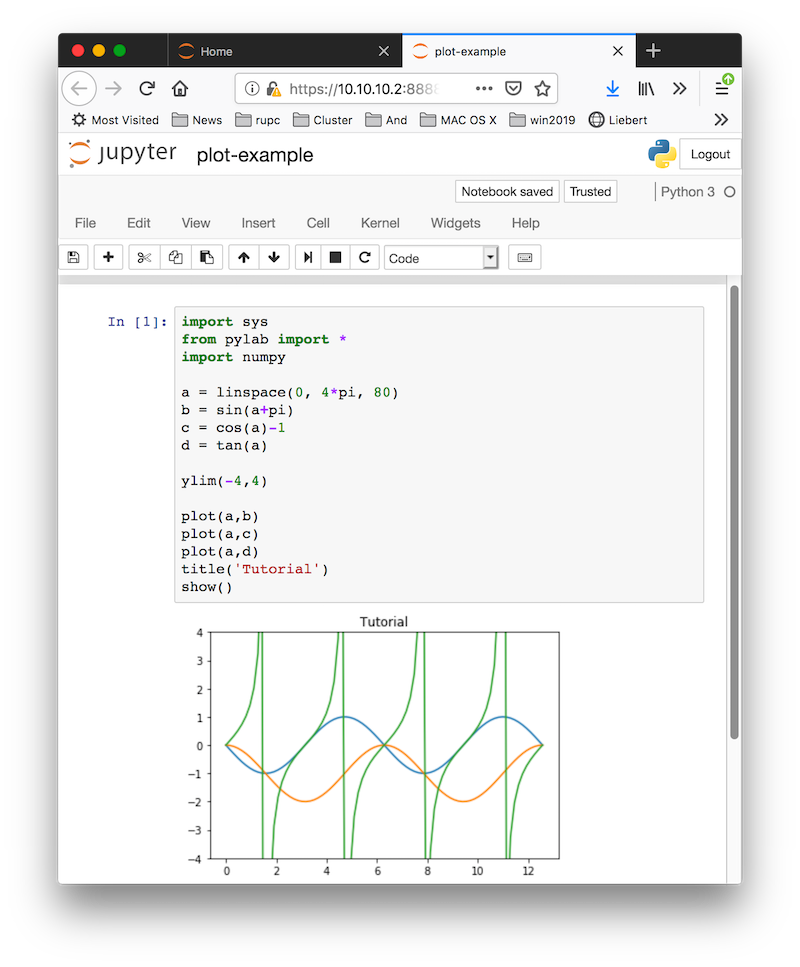
Enter the password you created when configuring Jupyter Notebook, then log in.
Example output or screenshot:
-
When you finish using Jupyter Notebook, stop the server on RUPC by clicking the Quit button on the Jupyter Notebook home screen. The Logout button only ends your browser session; it does not stop the kernel or the server running on RUPC.
Example output or screenshot:
Alternatively, press CTRL-C in the terminal where you started the server, then enter Y to confirm. Example output: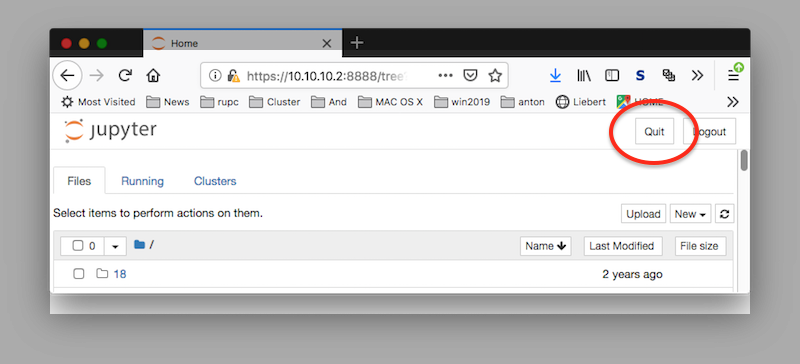
^C[I 17:03:39.073 NotebookApp] interrupted Serving notebooks from local directory: /mnt/home/udo 1 active kernels The Jupyter Notebook is running at: https://10.10.10.2:8888/ Shutdown this notebook server (y/[n])? y [C 17:03:44.015 NotebookApp] Shutdown confirmed [I 17:03:44.016 NotebookApp] Shutting down kernels [I 17:03:44.418 NotebookApp] Kernel shutdown: 715f00af-504f-48d1-976c-333590672ddd
Quick Way to Run Jupyter Notebook
This method runs Jupyter Notebook without a password or an encrypted web connection. Files accessible through the notebook are therefore not protected by a web login. You must also specify the --ip address parameter on the command line each time you start the notebook.On RUPC
- Log in to the cluster and load the Anaconda2 module:
module load anaconda2 -
Start the Jupyter Notebook server:
The output will look similar to the example below. Look for the HTTP address and port number (shown in blue in the original output):
jupyter notebook --no-browser --ip 10.10.10.2[10:16:43]udo@rupc02:~>jupyter notebook --no-browser --ip 10.10.10.2 [I 10:16:44.736 NotebookApp] Serving notebooks from local directory: /mnt/home/udo [I 10:16:44.736 NotebookApp] 0 active kernels [I 10:16:44.736 NotebookApp] The Jupyter Notebook is running at: http://10.10.10.2:8888/ [I 10:16:44.736 NotebookApp] Use Control-C to stop this server and shut down all kernels (twice to skip confirmation).
Remarks
To run Jupyter Notebook with Python 3, load the corresponding Anaconda module and follow the same steps. See the example output below:
[20:19:06]udo@rupc02:~>module load anaconda3
[20:19:16]udo@rupc02:~>jupyter-notebook
[I 20:19:23.917 NotebookApp] Serving notebooks from local directory: /mnt/home/udo
[I 20:19:23.917 NotebookApp] 0 active kernels
[I 20:19:23.917 NotebookApp] The Jupyter Notebook is running at:  https://10.10.10.2:8888/
[I 20:19:23.918 NotebookApp] Use Control-C to stop this server and shut down all kernels (twice to skip confirmation).
[I 20:19:53.784 NotebookApp] 302 GET / (10.2.0.18) 0.47ms
[W 20:19:53.944 NotebookApp] /mnt/home/udo/.#1.chpl doesn't exist
[W 20:19:54.098 NotebookApp] /mnt/home/udo/.#1.chpl doesn't exist
[I 20:20:36.392 NotebookApp] 302 GET / (10.2.0.18) 0.35ms
[W 20:20:36.905 NotebookApp] /mnt/home/udo/.#1.chpl doesn't exist
[I 20:20:54.462 NotebookApp] Creating new notebook in
[I 20:20:55.280 NotebookApp] Kernel started: f89ab83a-c69a-40c3-adba-74e0df9d0001
[I 20:21:27.852 NotebookApp] Saving file at /Untitled.ipynb
^C
[I 20:21:35.010 NotebookApp] interrupted
Serving notebooks from local directory: /mnt/home/udo
1 active kernels
The Jupyter Notebook is running at: https://10.10.10.2:8888/
Shutdown this notebook server (y/[n])? y
[C 20:21:36.715 NotebookApp] Shutdown confirmed
[I 20:21:36.716 NotebookApp] Shutting down kernels
[I 20:21:37.118 NotebookApp] Kernel shutdown: f89ab83a-c69a-40c3-adba-74e0df9d0001
jupyter notebook
jupyter notebook --no-browser --ip 10.10.10.2